Rain and flow sensors for irrigation systems are widely available on the market in both wireless and hard-wired versions. Most rain sensors are employing hygroscopic disks that swell in the presence of rain and shrink back down again as they dry out — an electrical switch is, in turn, depressed or released by the hygroscopic disk stack, and the rate of drying is typically adjusted by controlling the ventilation reaching the stack. Flow meters on the other hand usually have a rotating element that makes either a reed relay, either a hall sensor to trigger.
The RainMachine has software rain/flow sensor options, with an adjustable Rain/Flow amount. This is adjustable under each program.
RainMachine Mini-8
We support both wireless and wired rain sensors and have tested compatibility with the major brands. To install and enable a rain sensor, wire up the sensor according to the diagram provided in the box provided with your sensor.
After connecting the rain sensor to its own power supply or to the 24VAC terminals on the RainMachine (needed for wireless versions), connect the common wire to either common terminal, and the other wire to the first rain sensor terminal.

After successfully attaching the rain sensor to the Mini-8 device open the mobile app or go to the https://my.rainmachine.com web app. Then:
- Go to "Settings - Restrictions - Rain Sensor"
- Use the ON/OFF switch to activate Rain Sensor
Congratulations! The rain sensor is now active and every time rain is detected watering will be stopped.
RainMachine Touch HD-12/16 (2nd gen)
The RainMachine Touch HD-12/16 (2nd generation from 2015 and up) series offers the possibility of connecting either a rain sensor, either a flow sensor to the interface header.
Note: Only one of the two can be connected to the RainMachine Touch HD at a time.
Attaching rain/flow sensors to the dedicated sense input.
For software control and reporting, the rain/flow sensor should be connected to the special port on the right side of the controller like depicted on the following images. There are different setups that use the dedicated sensor inputs, the most frequently seen connections are the following:
- ON/OFF type sensors
- Active sensor powered by the RainMachine
- Active sensor powered externally
1. ON/OFF type sensor
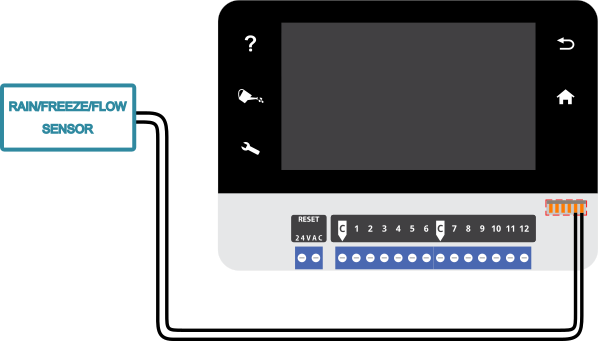
After successfully attaching the rain/flow sensor to the RainMachine Touch HD-12/16 device open the mobile app or web app:
Setup for rain sensor:
- attach the rain sensor to the RainMachine Touch HD-12/16 device using the cable adapter that can be purchased separately as an optional RainMachine accessory.
- go to "Settings - Restrictions - Rain Sensor"
- use the ON/OFF switch to activate Rain Sensor
- optionally you can select the type of your Rain Sensor as "Normally closed"
- select what action RainMachine will do after the rain had stopped.
Setup for flow sensor: Coming soon!
Congratulations! The rain/flow sensor is now up and running!
- Rain-sensing: every time rain is detected watering will be stopped
- Flow sensing: water consumption measurements will now be available
2. Active sensor powered by the RainMachine
The setup is slightly different for rain/flow sensors that require a power source to operate. Sensors that require a 5V supply rail should be connected as seen on the picture below:
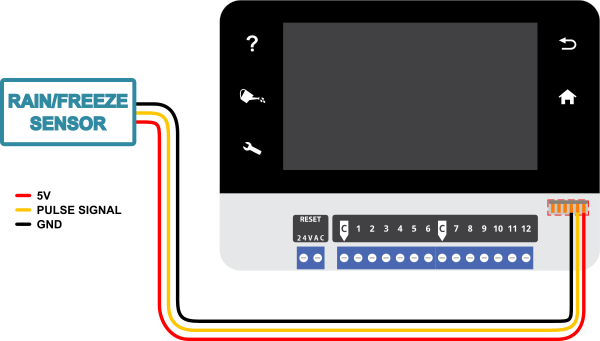
Connecting a rain sensor like on the image above (on the right side) allows you to have software control over the effects of eventual rain events seen by the rain sensor. A Rain Sensor cable adapter is available for purchase online.
Please note that the 5V output is protected with a 180R series resistor. This means that sensors which require more than a few milliamps need to be powered externally.
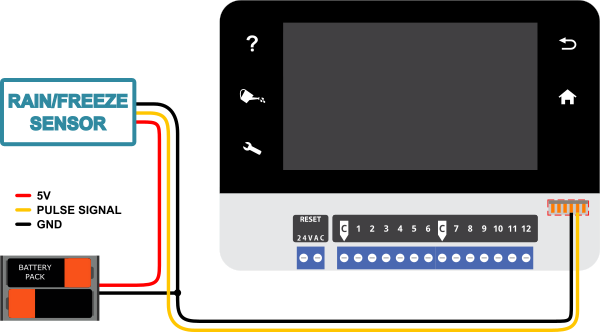
3. Active sensor powered externally
External power can be applied to the sensors either from batteries or from DC adapters. The following image shows an example of a sensor being powered from a battery pack. Important: the ground wire of the RainMachine and of the battery pack must be connected for this setup to work.
Be sure to read the sensor datasheet before connecting an external supply to the sensor as voltage ratings may differ from a sensor to another. Skipping this step may result in your sensor getting damaged beyond repair.
Mobile Notifications
A mobile push notification will be sent every time the attached rain sensor detects rain.
To learn more about RainMachine mobile app push notifications read this article.
Attaching rain sensors without software control
If software control is not desired, one can attach rain sensors like depicted on the following images. There are two frequently seen connections:
- ON/OFF type sensor
- powered ON/OFF type sensor
1. ON/OFF type sensor
The most common Rain/Freeze click sensors don't require any other power source. When rain is sensed, power is simply cut off by disconnecting the Common Wire from the watering zones.
To wire up the Rain/Freeze click sensor to the Touch HD-12/16, you will need to wire the sensor in series with the common wire, between the valves and the common terminal.
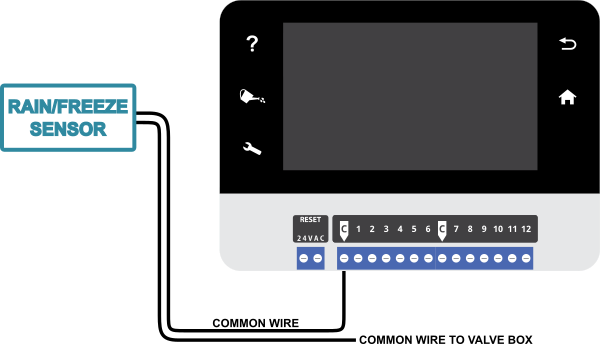
If you choose to connect the sensor in series with the common wire, you will not be able to control it using the RainMachine software. Th direct mode is a hardware-only mode, it will just switch the common wire on or off your valve box.
2. Powered ON/OFF type rain sensor
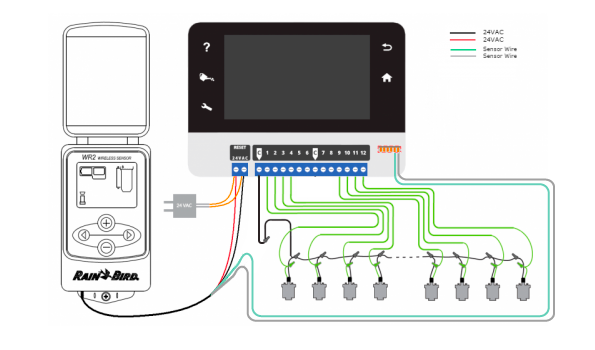
An example of interfacing a powered Rain/Freeze sensor (a RainBird WR2) to the RainMachine HD-12/16 can be seen on the picture below. The 24VAC power connection is shared by both devices, the relay output of the sensor is connected in series with the common line. Whenever the sensor detects rain, the internal relay will open, effectively disabling watering.
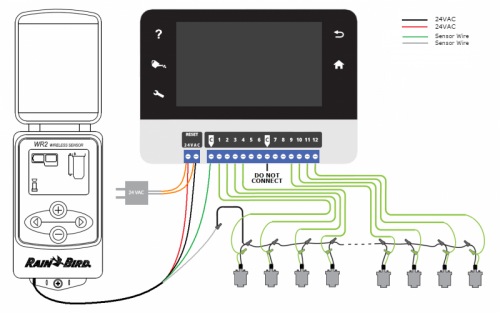
Alternatively, you can connect the RainBird WR2 Rain/Freeze sensor using the Rain Sensor cable adapter which can be purchased from here.
After connecting the Rain sensor, go to "Settings - Restrictions - Rain Sensor", use the ON/OFF switch to activate Rain Sensor. Optionally you can select the type of your Rain Sensor as "Normally closed"
After that, you can select what action RainMachine will do after the rain had stopped.
Debugging rain sensor issues
To debug rain sensor-related issues one must isolate the root cause: a first move is to determine whether the issue is within the sensor, the RainMachine or the wiring. A general debug procedure is this:
1. disconnect the sensor by removing the sensor cable from the side port
2. enable the rain sensor feature in the RM user interface
3. select normally closed option
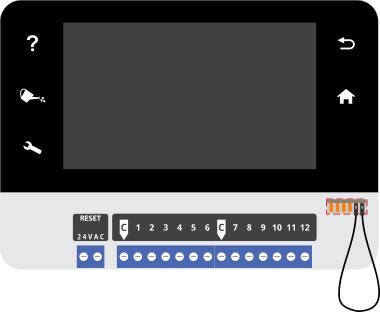
4. use a dupont jumper cable (or a tweezer) to short the two rightmost terminals on the
side port of the sprinkler. Your tweezer/cable will act as the rain sensor for the duration of the experiment - see picture below for reference.
5. observe the display of your RM:
- you should see the "Rain detected!" message appearing when you disconnect the two terminals
- you should see the "Rain detected!" message disappearing when you connect the two terminals
If you see the message appear/disappear, your RainMachine Touch HD-12/16 is working fine and the problem must be somewhere down the cable. The next thing that should be checked is the polarity and integrity of the cable, especially where the RainMachine Touch HD-12/16 breakout harness and the sensor's wires are joined. If there is a multimeter at hand, use the beeper function to find eventual open/short circuits - just make sure you keep everything unpowered during the measurements.
If the RainMachine Touch HD-12/16 does not react to the insertion/removal of the jumper cable (allow 1-2 seconds for it to do so), then the fault is within the RainMachine - check for eventual oxidization on the connector pins and reinsert the connector 2-3 times.
RainMachine Pro-8/16
1. ON/OFF type rain sensor
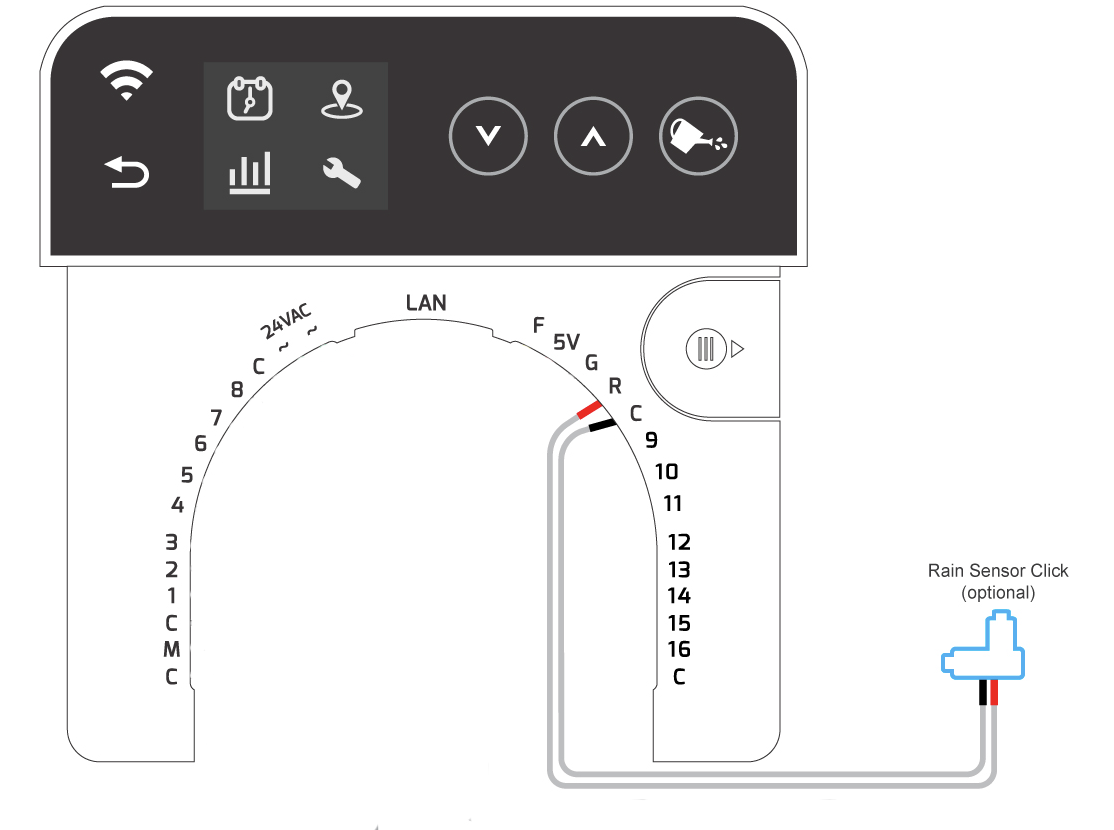
Attach the rain sensor to the RainMachine Touch Pro-8/16 device on the R and C connectors.
After successfully attaching the rain/flow sensor to the RainMachine Pro-8/16 device open the mobile app or web app:
Setup for rain sensor:
- go to "Settings - Restrictions - Rain Sensor"
- use the ON/OFF switch to activate Rain Sensor
- optionally you can select the type of your Rain Sensor as "Normally closed"
- select what action RainMachine will do after the rain had stopped.
2. Powered ON/OFF type rain sensor

An example of interfacing a powered Rain/Freeze sensor (a RainBird WR2) to the RainMachine Pro-8/16 can be seen in the picture above. The 24VAC power connection is shared by both devices, the relay output of the sensor is connected to the R and C connectors.
After connecting the Rain sensor, go to "Settings - Restrictions - Rain Sensor", use the ON/OFF switch to activate Rain Sensor. Optionally you can select the type of your Rain Sensor as "Normally closed"
After that, you can select what action RainMachine will do after the rain had stopped.
If this doesn't fix anything, you can get further help from RainMachine Support.
Comments
0 comments
Article is closed for comments.