Introduction
A flow meter usually consists of a short pipe and an internal magnet revolving inside the pipe. The speed at which the magnet rotates is proportional to the water flowing through the pipe. The changes in the magnetic field are picked up at each rotation either by a reed relay (a small switch that closes when the magnet is close), or by a hall sensor and a signal shaping circuit. Both type of sensors can be used to pulse the RainMachine Pro-8/16 flow input terminal, and – by knowing the rotation/gallons ratio – water consumption can be measured. RainMachine Pro-16 supports three types of flow meter connections, the electrical connections and the software setup is described separately for each one.
The RainMachine Pro flow meter input can capture pulse rates up to 200Hz. Going above this limit will likely result in the RainMachine missing pulses and reporting lower flow rates than the actual values. To check whether a given flow meter qualifies or not, one should examine how many pulses it would send at maximum flow rate. It is this value that must not exceed the 200Hz limit.
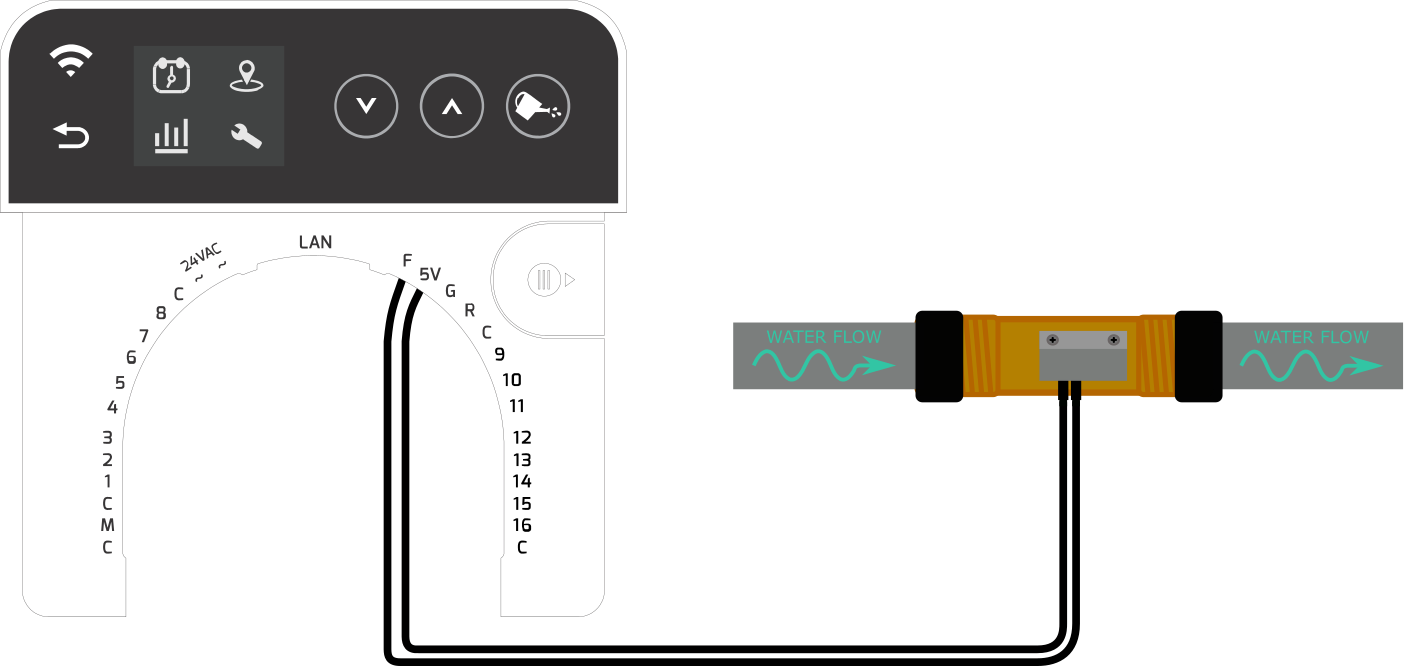
1. Two-wire (reed-type) flow sensor
Two-wire flow sensors must be connected between the 5V and F terminals, following the wiring diagram below. There is no recommended polarity, these are simple connect/disconnect switches controlled by a magnet.
2. Three-wire (hall-type) flow sensor
Three-wire sensors are not simple ON/OFF switches and need power to operate. These sensors usually work across an input voltage range of 5V-24V and draw around 15mA of current. Power is supplied through the red (5V) and black ( GND) wires. The third (yellow) wire is an active output which can be used to drive the RainMachine PRO-8/16 F flow input terminal.
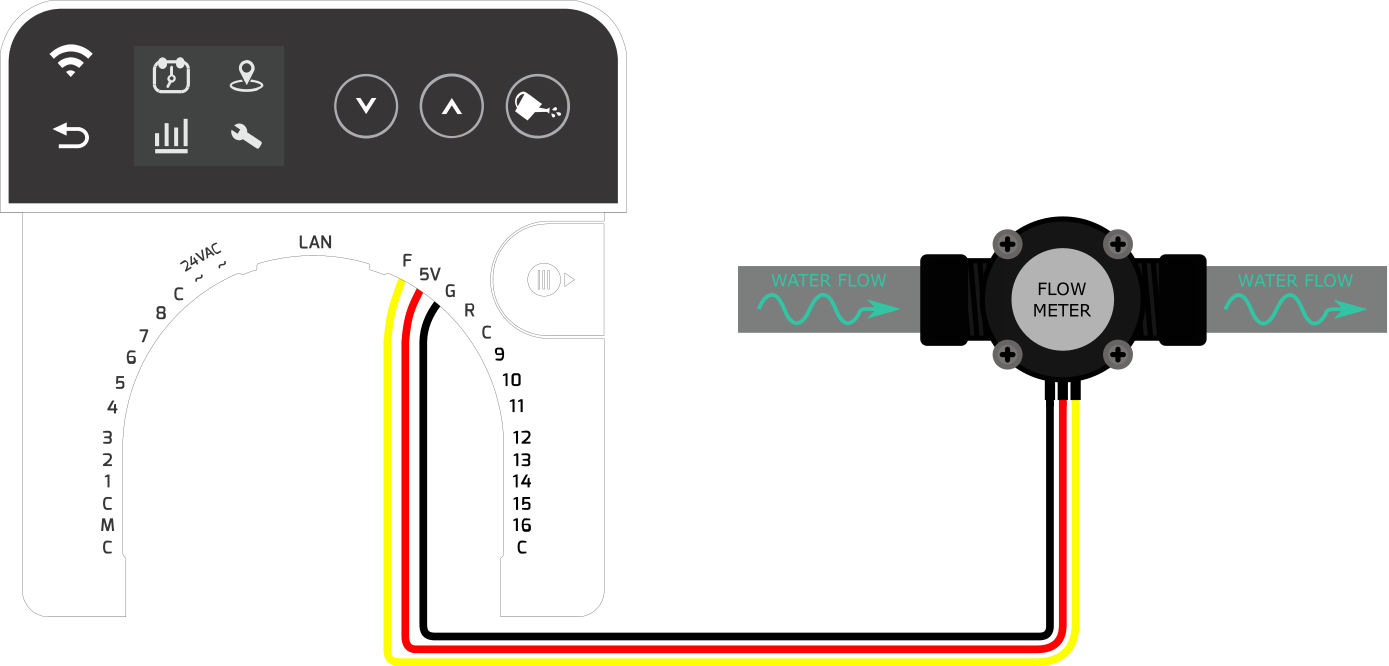
2.1. Three-wire (hall-type) flow sensor powered from RainMachine Pro-8/16
If needed, the RainMachine Pro-8/16 can supply power to rain or flow sensors, the dedicated output can deliver up to 35mA@5V. In such cases, the flow sensor must be connected to the 5V, F, and GND terminals, following the wiring diagram below.
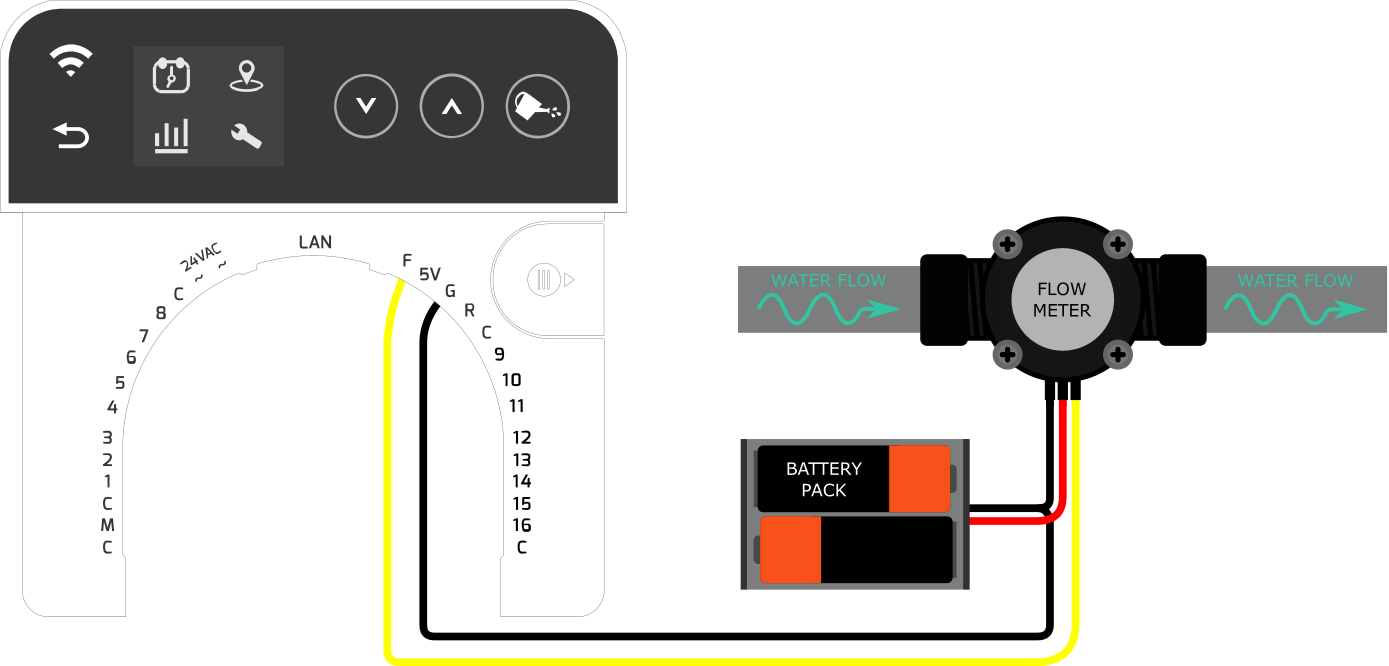
2.2. Three-wire flow sensor powered externally
If the three-wire sensor is already powered externally, two connections are needed to make the flow sensor work with the RainMachine Pro-8/16. The yellow wire must be wired to the flow sense input (F) while the black wire must be connected to GND, for reference.
Please note that some flow meters (such as the Hunter HC100) might have three wires of which only two are used. Reading the user guide or installation manual of the sensor is highly recommended in order to avoid incorrect wiring
3. Software setup
The flow sensors from these setups only deliver the impulses to the sprinkler, to have that translated into water consumption, the flow sensor input must be enabled and the click/water consumption ratio must be given.
3.1 Enabling flow sensor input from the local interface
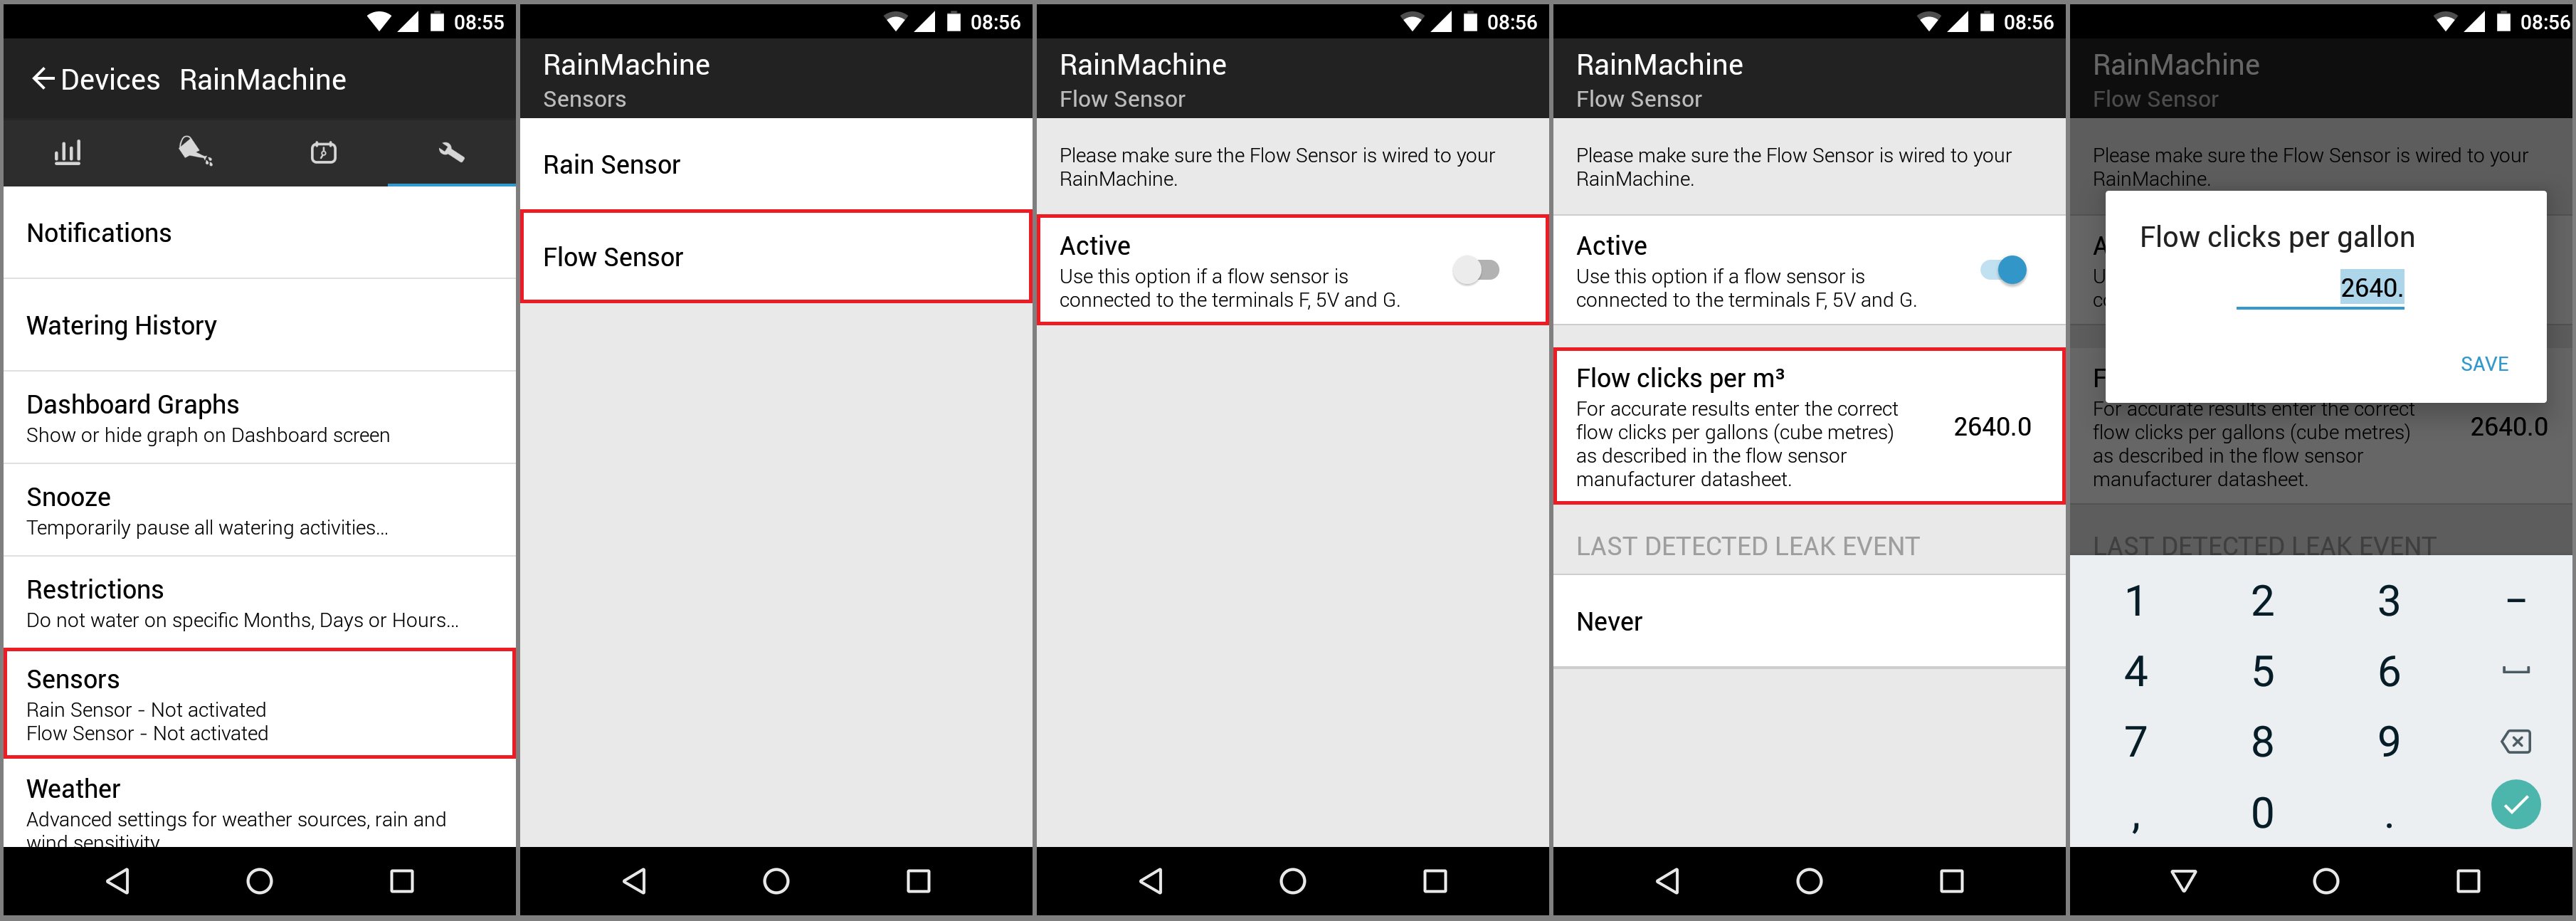
While enabling the sensor is simple, and can be done from the local user interface (touchscreen), you will need your phone or computer to enter the amount of water flowing through with each impulse. This information is usually printed on the box of the sensor, or given by the seller you bought the sensor from. To enable the flow sensor from the Pro-16 local interface, tap on the icons highlighted with red:

3.2 Enabling flow sensor input from your phone, or Web UI
Since you need your phone or the RainMachine web interface to enter the gallons/impulse ratio, it's easier to do the whole setup from there. To activate the sensor input and enter the gallons/impulse ratio from your phone, tap on the highlighted menu points:
You can do the same from the WebUI, by accessing my.rainmachine.com - you will need to enter your username and password.
There are a couple of controls you can adjust to set up leak detection with a flow meter. The screenshot below shows the settings screen with the adjustable parameters. To enable flow metering, you must check the "Use hardware flow sensor" checkbox, enter the clicks/gallon rate from your flow meter's datasheet and the value the flow meter index showed at install. This will result in the counter incrementing with the defined rate, beginning from the start index.
Pressing the "RESET" from the left side of the screen will result in the overall water consumption being reset to zero.
Pressing the "RESET" from the right side of the screen will result in clearing the date of the last leak detection.
Note that neither of the "RESET" buttons will clear any other variables.

Note:
You can connect only one sensor at a time, connecting multiple sensors will most likely result in permanent damage of the sensors.
4. Supported flow meters
The flow input frequency limit of the RainMachine HD is 3Hz. It is a good practice to consult the supported devices list or to do a short calculation before ordering a flow meter for your irrigation system. The following flow meters match the criteria to be used with either of the RainMachine HD units:
Comments
0 comments
Please sign in to leave a comment.